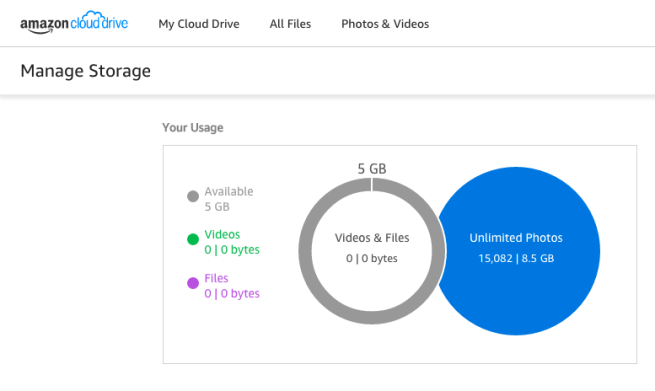
Back in November 2014, Amazon announced unlimited photo storage for everyone with Prime membership. This means that if you have Amazon Prime, you can go to Amazon Cloud Drive and claim your online space. Photos don’t “count” towards your online cloud drive quota (although videos do)– see the snapshot below, where the quotas are clearly separated.
If you’re like me and use iOS, though, it hasn’t been super-straightforward to figure out how to synchronize photos from the new Mac OS X Photos app to your Amazon Cloud Drive. Of course, you can use Apple’s iCloud Photos, but if you don’t want to use iCloud Photos for whatever reason– you’re on a budget, you want to diversify your precious photo collection away from Apple, or you’re just a geek– you may want to try uploading your photos to Amazon.
Important note: the following technique will sync the actual original photos, including dates and latitude/longitude information, but not additional metadata– e.g. Mac OS X Photos album information or any notes. If you want to do that, you should just a more comprehensive backup technique. In addition, in this version, I am excluding video files, which count towards the quota. But if you’re just looking for a straightforward way to move your original photos to the Amazon Cloud, read on!
While doing this is relatively straightforward, I had to figure out much of it myself. First, you could try Amazon Cloud Drive Desktop, but that has the disadvantage of requiring drag and drop of thousands of files and the inability to exclude video files, which do count towards your quota.
I tried a few other things, including DriveSink, but ended up deciding that rclone was the easiest tool to use. From here, I’ll just give you precise step-by-step instructions for how to use rclone to sync your photos to your Amazon Cloud Drive. Note: to follow these, it’s best if you are reasonably familiar with Unix and Terminal commands.
First, open up Terminal– it’s built in to Mac OS X.
Download rclone:
curl -O http://downloads.rclone.org/rclone-current-osx-386.zip
Unzip it:
unzip rclone-current-osx-386.zip
Copy it to /usr/local/bin (or your favorite directory in your path):
sudo mkdir -p /usr/local/bin
sudo cp rclone /usr/local/bin
Configure rclone to sync with your Amazon drive:
rclone config
You should get text that looks like this:
e) Edit existing remote
n) New remote
d) Delete remote
q) Quit config
Choose n. I used the name clouddrive when prompted for a name. Choose Amazon Cloud Drive when prompted for the source type. Leave the application client id blank and the secret blank. What then happens is that rclone pops up a web browser that prompts you to log into your cloud drive account and establishes a hidden file (~/.rclone.conf) that allows rclone to sync to your Amazon Cloud Drive.
Now you’re ready to sync your photos to Amazon! The photos in the Apple OS X photos app appear to be located here by default:
cd ~/Pictures/Photos\ Library.photoslibrary/
And the original photos appear to be located in the Masters subdirectory. From here, let’s make sure it does what you think it will do:
rclone sync -v --dry-run --bwlimit 2M --include '*.{JPG,jpg,PNG,png}' Masters clouddrive:photobackup
The –dry-run flag says what it intends to do without actually doing it. If the output looks correct, go ahead and remove the –dry-run flag and start the task. This will create a top-level directory called photobackup on your Amazon Cloud Drive and start synchronizing all pictures to it:
rclone sync -v --dry-run --bwlimit 2M --include '*.{JPG,jpg,PNG,png}' Masters clouddrive:photobackup
I added the –bwlimit because if you don’t, you can sop up all the upload Internet bandwidth in your house and you could make your family upset with you! See the rclone docs for more information and adjust the parameter as you see fit. Note that Mbps (megabytes per second) is very different from mbps (megabits per second)– Google has a built-in megabit to megabyte conversion calculator if you want to calculate. If you’re not concerned about throttling your connection, though, just remove the –bwlimit argument and go full speed ahead!
At this point, I’m waiting for the upload to finish– it can take a very long time (days even) depending on how fast your upload connection is and how many gigabytes of photos you have.
With that said, you can immediately start browsing your photos. You can go to https://www.amazon.com/clouddrive to see them or your can browse them on your iPhone/iPad/etc. using the excellent Amazon Photos app. Candidly, I was surprised by how good the Amazon Photos app is– browsing thousands of images is effortless and, from my perspective, snappier and faster than the native Photos app on my Mac.
Overall, I was surprised by how easy the whole process was. Next on my list is to schedule a launchd job to execute the rclone command on a daily basis so that all my latest photos can be uploaded to the Amazon cloud!
Updates:
- If you are using iPhoto 10 or 11 (instead of Photos), use: cd ~/Pictures/iPhoto Library.photolibrary instead of the above. For other versions of iPhoto, see the necessary paths here.
- If you want to upload additional image types (e.g. RAW files) or movies, simply modify the include command above: –include ‘*.{JPG,jpg,PNG,png,MOV,mov,RAW,raw}’. Just note that movies will count against your Amazon Cloud Drive quota (photos won’t), and RAW files *might* (see about RAW photo files for details).
- When you start doing this, you can easily make your life miserable by using up all of your upstream Internet bandwidth. This affects things like browsing, among other things. To get around this, see my blog post on throttling uploads.

This was AWESOME!!! Thank you so much!
LikeLike
Thanks! While simple, it did end up being harder than I would have thought– glad it helped!
LikeLike
I am looking for some help. I typed:
sudo cp rclone /usr/local/bin
After entering the password I get…
cp: rclone: No such file or directory
Any help will be appreciated, thanks!
LikeLike
Sorry, looks like with Yosemite, you may have to do a
sudo mkdir /usr/local/binfirst. See http://apple.stackexchange.com/questions/157979/usr-local-doesnt-exist-in-fresh-install-yosemite. I’ll update the post to make sure that folks do that!LikeLike
after I use the command line above i then try this:
sudo cp rclone /usr/local/bin
The response I get is this… cp: rclone: No such file or directory
When I try rclone config
I get -bash: rclone: command not found
LikeLike
Oops, I missed a step. When you unzipped rclone, you probably got:
$ unzip rclone-current-osx-386.zip

Archive:  rclone-current-osx-386.zip

   creating: rclone-v1.27-osx-386/

  inflating: rclone-v1.27-osx-386/README.html

  inflating: rclone-v1.27-osx-386/rclone

  inflating: rclone-v1.27-osx-386/rclone.1

  inflating: rclone-v1.27-osx-386/README.txt
You first have to change the directory, so type:
cd rclone-v1.27-osx-386

sudo mkdir -p /usr/local/bin

sudo cp rclone /usr/local/bin
and then it should all work.
LikeLike
Hi – Thanks so much for writing this, it is super helpful. One question: once I do the initial upload, do I run the same exact command again to upload recently added pictures, or will that attempt to upload the entire library again? Is there any modification I should make? Thanks again!
LikeLike
Yes– just run exactly the same command again. What rclone will do is compare all of your current files against the files on your Amazon drive and sync over anything that’s been added/changed. It does have to scan through everything to know what’s been added/changed, but when the actual sync happens, you’ll get a bunch of “Sizes identical, Unchanged skipping” messages. So it’s not completely costless, but it will run *much*, *much* faster than re-copying over all of your pictures.
LikeLike
That’s really great. Many thanks for putting so much time into building this. Look forward to reading more from this site!
LikeLike
Thanks for researching all of this! I just tried it on our late 2014 Mac Mini running Yosemite and it was working great – for about 15 minutes. (I was using the”–bwlimit 2M” option)
Then it hosed the entire Network connection. I’m not sure why. The Ethernet connection showed up as “self-assigned IP” and I couldn’t fix it until I rebooted our Router.
So I tried it again without the “bwlimit” option and it worked for about 3 minutes and then hosed the Network connection again. I guess I won’t be trying this again until I can figure out what happened.
Here’s some output: (shows some good copies and then – all of a sudden – a “no route to host” message)
2016/02/06 14:03:40 2015/Apr 16, 2015/P4120223.JPG: Copied (new)
2016/02/06 14:03:41 2005/Nov 19, 2005/DSCF0039_039_037.JPG: Copied (new)
2016/02/06 14:03:41 2008/UNTITLED/PA080825.JPG: Copied (new)
2016/02/06 14:03:41 2012/Sep 28, 2012_2/Screen shot 2012-09-28 at 2.57.36 PM.png: Copied (new)
2016/02/06 14:03:44
Transferred: 125745032 Bytes ( 679.03 kByte/s)
Errors: 0
Checks: 9
Transferred: 125
Elapsed time: 3m0.8s
Transferring:
* 2011/Jul 6, 2011/P7020789.JPG: 24% done. avg: 168.0, cur: 243.4 kByte/s. ETA: 4s
* 2011/Wisconsin Trip – 2011/P9250754.JPG: 85% done. avg: 351.2, cur: 371.3 kByte/s. ETA: 0s
* 2015/11/26/20151126-141542/PB170352.JPG: 90% done. avg: 244.8, cur: 249.6 kByte/s. ETA: 0s
* 2014/Aug 8, 2014/IMG_20140808_112103.jpg: 23% done. avg: 256.1, cur: 223.8 kByte/s. ETA: 8s
2016/02/06 14:03:45 2015/11/26/20151126-141542/PB170352.JPG: Copied (new)
2016/02/06 14:03:45 2011/Wisconsin Trip – 2011/P9250754.JPG: Copied (new)
2016/02/06 14:04:24 2011/Jul 6, 2011/P7020789.JPG: Failed to copy: Post https://content-na.drive.amazonaws.com/cdproxy/nodes?suppress=deduplication: read tcp 192.168.11.35:49552->52.7.71.171:443: read: no route to host
2016/02/06 14:04:24 2008/Photos 0822-1123/PB150255.JPG: Failed to copy: Post https://content-na.drive.amazonaws.com/cdproxy/nodes?suppress=deduplication: dial tcp: lookup content-na.drive.amazonaws.com on 192.168.11.1:53: write udp 192.168.11.35:60662->192.168.11.1:53: write: host is down
2016/02/06 14:04:24 2011/Feb 4, 2011/P2010791.JPG: Failed to copy: Post https://content-na.drive.amazonaws.com/cdproxy/nodes?suppress=deduplication: dial tcp: lookup content-na.drive.amazonaws.com on 192.168.11.1:53: write udp 192.168.11.35:49555->192.168.11.1:53: write: host is down
LikeLike
What kind of connection do you have at home? –bwlimit 2M is actually quite a lot– 2M is 2 Megabytes per second, or 16 megabits per second. This is faster than most residential internet upload speeds, particularly cable modems, which generally have upload speeds of around 5 megabits per second. You can try –bwlimit 200 (with no letters after the 200), which is 1.6 megabits per second. Failing that, I recommend looking my other post, https://earthalbumblog.wordpress.com/2016/01/03/black-magic-throttling-uploads-to-amazon-cloud-drive-google-drive-and-icloud-on-mac-os-x-el-capitan/, which gives you a separate way to throttle uploads. I ended up using that to throttle uploads because I know it’s a hard limit.
LikeLike
We have a Comcast cable internet connection. The upload speed is measured at 1.6Mbps on one website and 6.21Mbps on another – so I’m not really sure what it is. Does it make sense that running rclone can cause your whole connection to become unusable ? (even after restarting the Mac, I still had to restart the Router to get the Ethernet connection to work properly)
LikeLike
Yes– unfortunately, rclone (and google photos, Amazon uploader, iCloud uploader, etc.) can all cause your entire connection to be unusable and cause you to have to restart your cable modem/router. That’s why I published that other article on how to throttle your connection (i.e., stay well under the limit). If you stay well under the limit, you end up having fewer problems. You can google– there are dozens of articles on router clogging on super-fast uploads.
Try the command again with –bwlimit 100 (which is 0.8 megabits per second, well under your 1.6 megabit per second limit) and see whether that helps. That may not work– I am not sure how well rclone implements built-in throttling. If it doesn’t work that well, go to my other throttling post and replace the 3Mbps with 1 Mbps to ensure you’re within your limit.
If that works, you can gradually continue to increase the rate until you find the ceiling. I have Comcast at home and I’ve found that pegging the throttle threshold to about 80% of the max Comcast-allowed upload speed works– i.e., my speedtest.comcast.com rate is 5-6Mbps, so I ended up throttling around 4Mbps for the duration of my upload.
LikeLike
great article – many thanks
LikeLike
Sorry for not reading everything, but I want to make sure I understand this in a nutshell before reading in depth. These instructions explain how to upload what you currently have on your Mac, but does not provide an automatic syncing method.
Thanks, by the way, for sharing!
LikeLike
Yes, this article is principally focused on how to upload what’s currently on your Mac, but it will also work as the basis for automatic ongoing synchronization. Specifically, if you run the rclone command multiple times (i.e.– rclone sync -v –dry-run –bwlimit 2M –include ‘*.{JPG,jpg,PNG,png}’ Masters clouddrive:photobackup), each subsequent time you run it, it will only transfer any new/modified files.
I had intended to write how to do that, but I ended up using Google photos as my primary photo cloud data store instead. But if you want to synchronize to Amazon every day, you just have to have your mac automatically run the rclone command every day. To do that, I’d probably recommend using Mac’s internal job manager, launchd– pretty good description here. Hope this helps!
LikeLike
Hi, This is great. You really saved my life. Now I am uploading tens of Gigabytes of photos to Amazon with a single command and get to sleep 🙂
But what about the files that have errors?
Such as …
2016/11/10 18:39:43 2015/10/06/20151006-081939/IMG_0342.JPG: Upload error detected but didn’t finish upload: HTTP code 429: “429 Too Many Requests”, reponse body: {“logref”:”9c06872b-a729-11e6-8003-f124be35fd7d”,”message”:”Rate exceeded”,”code”:””}
(“429 Too Many ….
Will it try again by itself ? Or should I have logged the results and grep the error and I have to write the scripts to upload that failed ?
This is my first time to use it and it is being uploaded now….
Thanks~!
LikeLike
Sounds like you have some upload issues– you may have to try again. However, the command is idempotent– that is, you can just wait for the whole thing to finish and then run exactly the same command again. What will happen is that rclone will skip the files that were already uploaded and just automatically retry on those that failed– that’s the magic of rclone!
Separately, it sounds like you may be destabilizing your upload connection– see some of the comments earlier in this thread for how to fix that. In particular, you can just try something like:
rclone sync -v –bwlimit 200 –include ‘*.{JPG,jpg,PNG,png}’ Masters clouddrive:photobackup
and see if that works.
LikeLike
Hi, I made it most of the way through but when I put in the commands for the last part this is what I got. What am I doing wrong?
Griffins-MBP:~ Griffin$ cd ~/Pictures/Photos\ Library.photoslibrary/
Griffins-MBP:Photos Library.photoslibrary Griffin$ rclone sync -v –dry-run –bwlimit 2M –include ‘*.{JPG,jpg,PNG,png}’ Masters clouddrive:photobackup
2017/01/21 09:26:57 Config file “/Users/Griffin/.rclone.conf” not found – using defaults
2017/01/21 09:26:57 Starting bandwidth limiter at 2MBytes/s
2017/01/21 09:26:57 rclone: Version “v1.35” starting with parameters [“rclone” “sync” “-v” “–dry-run” “–bwlimit” “2M” “–include” “*.{JPG,jpg,PNG,png}” “Masters” “clouddrive:photobackup”]
2017/01/21 09:26:57 Failed to create file system for “clouddrive:photobackup”: didn’t find section in config file
Griffins-MBP:Photos Library.photoslibrary Griffin$
LikeLike
You didn’t properly configure rclone. Try following all the instructions again– your rclone config didn’t work. You can see that via this line of your output:
2017/01/21 09:26:57 Config file “/Users/Griffin/.rclone.conf” not found – using defaults
You can check to see whether you properly configured rclone by typing the following:
$ more ~/.rclone.conf
You should see something that looks like this:
[clouddrive]
type = amazon cloud drive
client_id =
client_secret =
token = {“access_token”: }
Hope that helps
LikeLike
My rclone config failed with the following comments: Waiting for code…
Got code
2017/01/11 10:08:03 Failed to configure token: failed to get token: Post https://api.amazon.com/auth/o2/token: net/http: TLS handshake timeout
LikeLike
Thank you for sharing your code! I’ve spent the last day using it to upload pictures, and it worked great except:
I have multiple photo libraries because the single one had gotten too large to open. I uploaded the first library just fine, which was about 5000 pictures. Then, I changed the path to upload the second, not thinking about the fact that it would sync and delete all the first set of pictures! It uploaded all the pictures, and then in the span of about 20 minutes, moved all those 5000 pictures to the trash.
Of course, on Prime Photos, you can only restore pictures from the trash by clicking each one individually. I have contacted Amazon to see if they can restore all the pictures for me at once, but am waiting to hear back.
Do you have any advice on how to move those photos from the trash back to the album? Is there any way to use rclone to upload more than one photo library? Thanks!!
LikeLike
Thank you for your detailed guide.
It works and most my photo library is now on Amazon Cloud.
But still there are several things that I do not understand and I would appreciate your help.
1) Now, I have a directory “photobackup” on Amazon Drive which is on my Mac, even when I am not connected with all photos. It takes thus disk space (here 29 Go). How can I have these pictures not copied back on my own disk while they are already stored in Photos application elsewhere?
2) With the iPhone Application, I can see only the photos coming from iPhone and saved on Amazon Drive on a dedicated directory Pictures/iPhone …
But I can’t configure it to see the photos saved from the Mac with rclone.
Are these 2 problems “normal”? What did I do wrong?
LikeLike
This is working great for me. The only thing I had to do to get it working was I had to manually create the “photobackup” directory on Cloud Drive using my browser.
Also, if you want to set up a daily cron task (I prefer cron to launchd), I’m trying to set one up at 4:10 PM daily. Also, not that this one includes movie files as well. Here’s what I’m going to try…
10 4 * * * /usr/local/bin/rclone sync -v –bwlimit 2M –include ‘~/Pictures/Photos\ Library.photoslibrary/*.{JPG,jpg,PNG,png,MOV,mov}’ Masters clouddrive:photobackup
LikeLike
Wow, great write up & HUGE problem solved. I’ve been trying to do this forever to have a redundant copy on Amazon … with the hope at some point I can scale back the size of the iCloud plan I have. Definitely good stuff; especially considering how easy this makes that redundant copy happen with Amazon or Google.
LikeLike
Just tried this but looks like there are Amazon initiated issues between clone and Amazon Drive
https://forum.rclone.org/t/rclone-has-been-banned-from-amazon-drive/2314 – thanks Amazon 😦
LikeLike
amazon killed rclone access 😦 https://github.com/ncw/rclone/issues/1417
LikeLike
FYI it appears that rclone has been banned from Amazon Cloud Drive. https://www.theregister.co.uk/2017/05/23/amazon_drive_bans_rclone_storage_client/
LikeLike
Thanks for this write up. Couple things to note that I ran across:
Running curl from Terminal in 10.12.6 as you indicated in your directions, I was pulling down a 90k file. unzip was failing thereafter. Downloaded the same file through the Chrome browser and much larger, 6.7MB. unzip succeeded after that.
during >rclone config, followed instructions and safari launched but prompted to Cancel or Reset my Keychain. Either selection, I end with an error on Amazon landing page.
LikeLike